How to Create a Maintenance Window in the Biller Portal
Invoice Cloud has a maintenance window feature in the Biller Portal, which prevents payment processing during a scheduled time period. The biller has the option of allowing the payer to view their bill only or display a custom message and prevent access to the customer payment portal.
To create a New Maintenance Window:
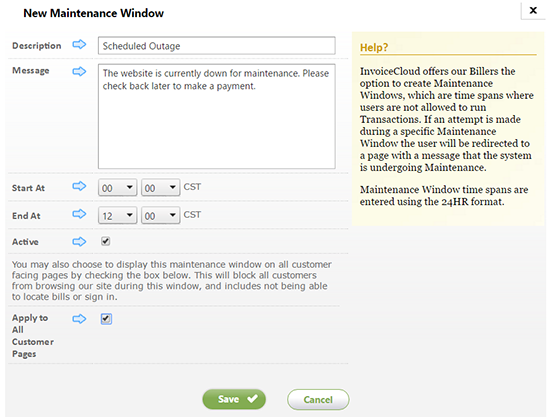
In the Biller Portal, go to Settings ![]() > Portal Customization > Maintenance Windows. Click on New Maintenance Window, enter the details and save.
> Portal Customization > Maintenance Windows. Click on New Maintenance Window, enter the details and save.

Description: Name of the maintenance window, in case there are multiple. This only displays in the Biller Portal.
Message: The message displayed for the customer. For example, “The website is currently down for maintenance. Please check back later to make a payment” has been entered above.
Start At/End At: The times should be entered in 24 hr format (military time), based on Central Standard Time. The server that holds the maintenance window is in CST and your time zone must be adjusted to start and end at the appropriate time.
- Maintenance Window for several days: set the start at time to 00:00 and the end time to 23:59. You will need to make the window inactive or delete it once it is no longer in effect.
- Maintenance Window for a partial day: for a window that starts and ends on the same date, simply enter the start and end time.
- Maintenance Window to overlap 2 days: for a window that starts on one day and ends on the next day, you will need to create two windows.
a. The 1st window will start at the designated start time and end at 23:59.
b. The 2nd window will start at 00:00 and end at the designated end time.
Active
: This field is checked by default.
Apply to All Customer Pages: Check “Apply to All Customer Pages” to prevent payers from accessing any information on the virtual site.
Save: Click on Save to make the maintenance window active during the selected time.
Here’s how the customer payment portal will look with the example maintenance window applied (with apply to all customer pages selected).

Note: Billers using Cloud IVR Connect that have an active maintenance window will prevent payers from making an IVR payment as well.
To view or modify your Active Maintenance Window:
In the Biller Portal, go to Settings ![]() > Portal Customization > Maintenance Windows. An active maintenance window can be edited or deleted. Click on the magnifying glass to edit or the red X to delete.
> Portal Customization > Maintenance Windows. An active maintenance window can be edited or deleted. Click on the magnifying glass to edit or the red X to delete.

