Published 9/7/23
Security is of paramount importance in the payment space. To protect your files as they are being transferred to us, we utilize FTP (File Transfer Protocol) and FileZilla. FileZilla supports FTP (File Transfer Protocol) over TLS (Transport Layer Security) and SFTP (Secure File Transfer Protocol). In essence, this program allows you to transfer securely and effectively nearly any file to another predetermined location. So whether you are new to the file transfer process or just need a refresher, read on to understand the steps involved.
Retrieving Files from InvoiceCloud
- When the connection is made, you will have two options, FromInvoiceCloud and ToInvoiceCloud. To retrieve files from InvoiceCloud, double-click on FromInvoiceCloud.
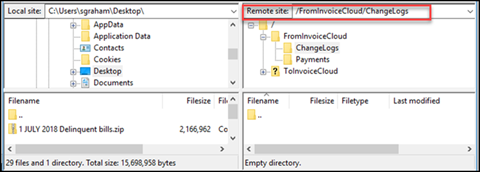
Note: If you see a question mark on the folder, double-clicking on it will make a call through FTP. - You will then be presented with two folders, ChangeLogs, and Payments. Double-click on whichever files you need to retrieve to open the folder.
- Click on the file from the directory in the right-hand corner and drag it to the bottom left-hand corner. A percentage bar will be displayed at the bottom of the page, indicating the progress of the file download. Once successfully downloaded, a pop-up tab will confirm that the transfer was successful.
Sending Files to InvoiceCloud
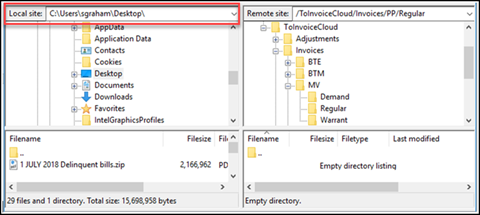
- If you need to upload an invoice file (BIF), adjustment file (BAF), or PDF images, you will start with the folder ToInvoiceCloud. Double-click on the ToInvoiceCloud folder to open any available folder

- Select the appropriate file for whichever you need to upload, Adjustments, Invoices, or PDFs. Double-clicking on a folder will provide you with numerous options to select from.
- Find the proper invoice type you need to upload and double-click on it:
- MV – Motor Vehicle
- RE – Real Estate
- PP – Personal Property
- UB – Utility Billing
- Depending on which invoice type you select, you may have several options. Select the appropriate one such as:
- Demand
- Regular
- Paperless
- Warrant
Note: Neither FileZilla nor InvoiceCloud can extract files from a compressed/zip folder. Please make sure to move any file within a compressed folder you would like to upload into the chosen folder before attempting to upload.
- Next in the upper left-hand column, find the file you would like to upload through the file explorer.
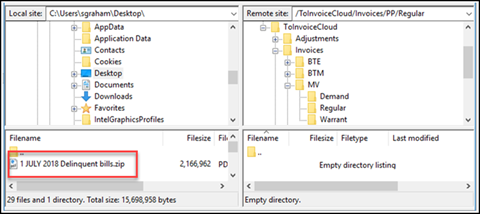
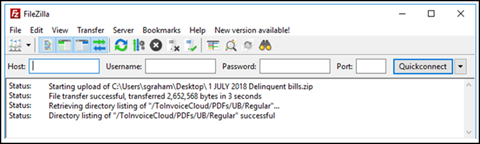
6. Click on the file from the bottom left-hand corner you would like to upload and drag it to the bottom right-hand corner. A percentage bar will display at the bottom of the page, indicating the progress of the file upload. Once successfully uploaded, a pop-up tab will confirm that the transfer was successful.
- Once the file is successfully loaded, it will upload through FTP which runs approximately every fifteen minutes.
- Be on the lookout for your Biller File Notifications to ensure that it has been uploaded.
 Deleting a File
- If you need to delete a file you have previously uploaded, simply right-click on the folder and select Delete.
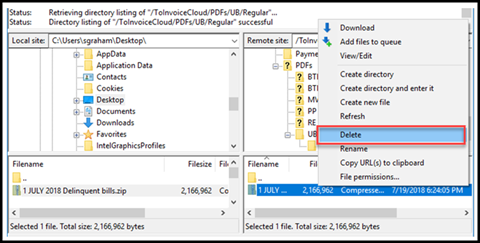
- You will receive a pop-up asking if you are sure you would like to delete to which you will select OK.
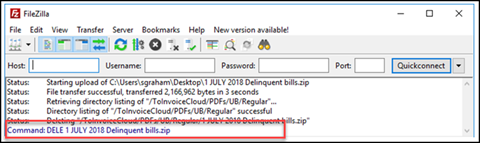
- When you see the blue Command: DELE the file has been deleted.
To download Utilizing Filezilla as a PDF, click here.
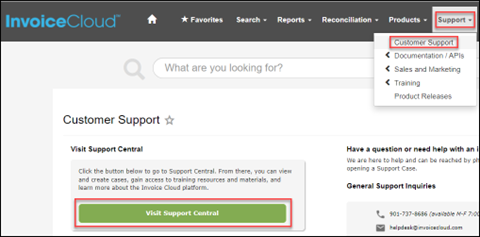
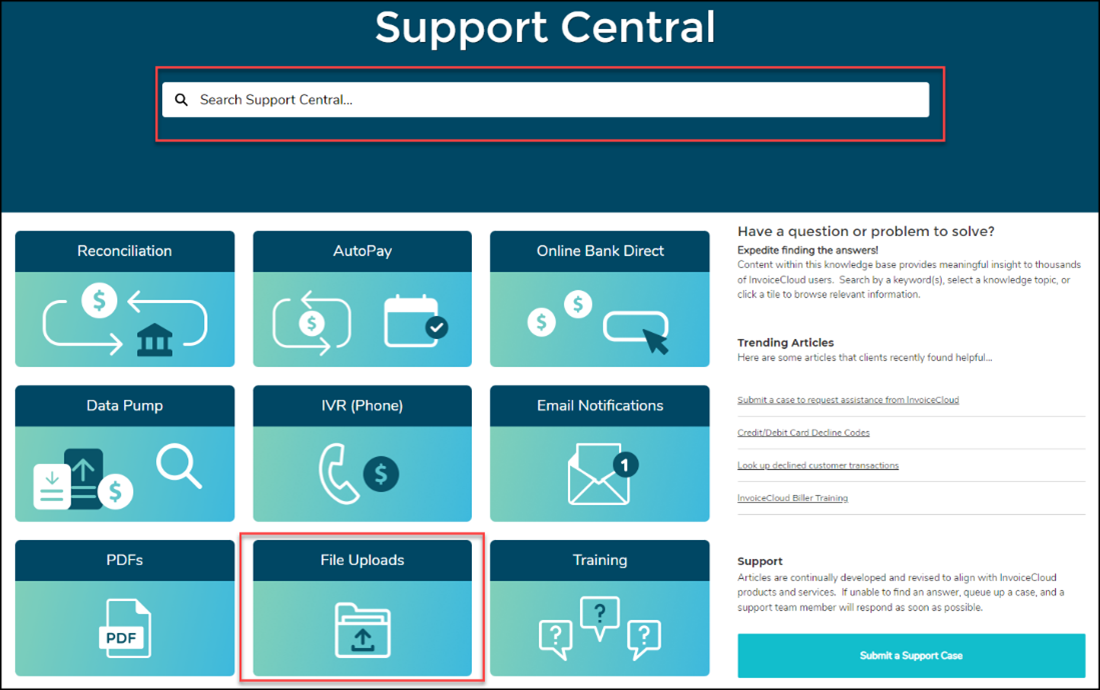
For additional information, please visit Support Central which is easily accessible from your Biller Portal. You can use the Search Support Central feature or click File Uploads.